
 English
 Русский
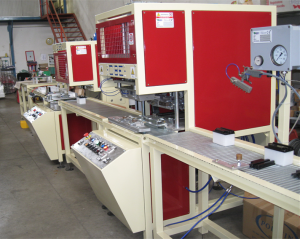
This MOTORCYCLE battery assembly line has been designed to perform the complete motorcycle battery range, from the small to the bigger one.
It has been engineered upgrading our existing automatic starter assembly line, one of the most performing on the market, due to our competences and skills.
The assembly line works properly with our COS machine and enveloper, but can also work with manual casted straps. The precision of the thermowelder grants the welding of the lid also around the poles (that are sometimes already melted on the straps).
Parts of the line, namely the movement of boxes and insertion of elements, are of a manual type.
Approximate dimensions of batteries are as follows: max L 175 w175 h 195 (top cover) and min L 100 w 58 h 90, which means that L0 can be performed changing the tools only (optional).
Process:
Testing is carried out at the beginning of the line, after which the operator transfers the boxes from the first roll conveyor (manually, free rolls) to the first station.
1) SHORT CIRCUIT STATION
Using the probes wired to the main electrical tester the operator carries out manual testing of the first and all subsequent cells. The results are displayed on the main panel in front of him, where the green light means that the cell is accepted, and the red light rejects the quality of the cells. The operator can replace the rejected cells, redo the test and push the battery from his workstation to the following one, to another operator.
2) INTERCELL WELDING STATION
The operator, after the preliminary process of preparation for each type of battery separately, brings the battery, on rollers, onto his left-hand side, placing it under his welding station. He stops the battery, closes the clamps/guidelines and carries out the electro-welding. Correct electro-welding position is achieved by changing the reference mask on the front and moving the reference arm to clamping spot.
Every time the welding position is reached, the operator pushes the button and the machine moves the electro-welding head to the first/second cell and performs the welding. Then the operator places the battery in the welding position for the next cell following the procedure, until the process is complete. Then he pushes the battery to the second station through the free roll conveyor.
3) LID THERMOWELDING STATION
Here the operator manually brings the battery (left side) and places it under the moving head. He also brings a lid behind him and places it in its own position. Then he pushes the buttons, and the head does the thermo-welding. He then releases the battery and pushes it to the next position.
4) PRESSURE LEAKAGE TEST
The operator will do the test on each cell one by one, with a manual pressure checking device, so he can see if there are any leakages.
The assembly line we propose is composed by the following equipment:
1) SHORT CIRCUIT CONTROL STATION
– short circuit control tester.
– cable with metal point.
2) ELECTRO WELDING SEMI-AUTOMATIC
– Operative head with pneumatic cylinder for up/down of head.
– Screw with hand wheel for regulation of working height.
– Welding clamps operated by oil-pressure cylinders.
– Oil-pressure control unit.
– Bench for positioning of batteries on different welding position.
– Buttons for start cycle.
3) HEAT SEALING MACHINE HALF AUTOMATIC
– Lid taking the head, moved by pneumatic cylinder and screw for manual regulation of height.
– Hot plate bench for positioning of batteries and their lifting by apposite cylinder for up/down.
– Screw for manual regulation of operative head.
– Buttons for start cycle.
4) LEAKAGE CONTROL MACHINE
– Leakage control tester.
– Manual spout for control of single cell.
5) ROLLER: Free roller for connection between electro welding machine and heat sealing machine.